


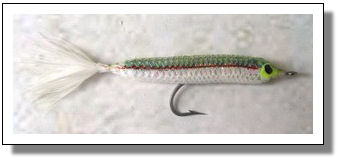
The Floating Minnow is a generic floating baitfish pattern that can be fished in both salt and fresh water and adapted in any way you see fit to suit your prey or preferences. Not only is this a fine surface baitfish imitation but it's also an effective fly when fished deep with a sinking line, close to but not on the bottom. The tying instructions given here can be used to tie a wide range of Floating Minnow patterns.
Tying the Floating Minnow
|
Hook: |
For salt water: D2546, M34007, 34011 or equivalent, #4-1/0: For fresh water, use D2451, D2141 or equivalent |
|
Thread: |
6/0, white, or olive or black for darker flies |
|
Body: |
1/2" or 1/3" pearl, silver, gold, or black/gold Corsair tubing, tied to extend one or two inches beyond bend, depending on overall length desired |
|
Tail and Insert: |
White or colored closed-cell foam--of a sufficient thickness and width to float the fly--inserted on top of shank, white marabou plume inserted beneath foam. |
|
Eyes: |
Black on yellow fabric paint |
 Determine how long you want the front portion of the body to be and poke the eye of the hook into the mesh of the tubing (between the thread lines) at a point that will allow you to achieve the proper length.
 Attach trying thread to the hook just behind the eye.
 Cut a piece of foam (of a sufficient density and length to float the fly) narrow enough to fit comfortably into the foam and insert it through the rear of the tubing, pushing it through until it comes out the front end of the tubing.
 Select a marabou plume that will be long enough to insert into the body with enough extending beyond the tubing to form a tail. Strip away lower fibers to make it easier to insert the stem into the body.
 Turn tubing on its side (away from you) and insert the marabou stem into the tubing from the rear and under the foam. Push the marabou through the tubing until the stem can be grasped and the plume drawn through the tubing until the desired tail length is attained.
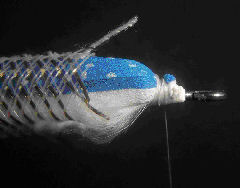 Tie down foam and trim excess if any.
 Tie the tubing down just in back of the thread lines and trim the excess.
 Turning to the rear portion of the fly now, push tubing forward so that more foam is revealed.Trim foam to desired length (as long as it's shorter than the tubing).
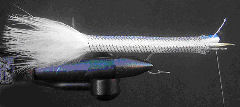
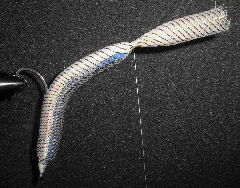 Tilt the fly eye downwards in the vise, as shown. Bend the tubing material off to an angle-at the same time stretching it somewhat to retain the taper--and with several turns attach your thread to the point where you want your tapered body to end-usually just behind the rear end of the foam insert--thus preserving the taper and securing the rear end. Take nine or ten turns of thread and tie off with a whip finish. Apply head cement to these wraps and also to head area.
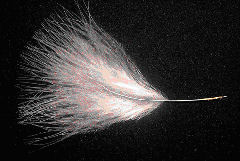
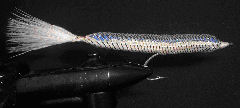 When cement is dry, trim away excess tubing to reveal the tail, as in the photo at left.
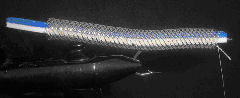
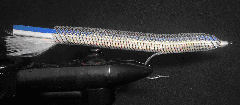
While optional, as a last step, I usually paint eyes onto the tubing and color the top of the tubing with a water-resistant marking pen, usually olive or blue, and color the thread lines on either side with a red or olive marker.
About Corsair Tubing
Corsair tubing comes in 1/2", 1/3", and 1/4" (these are the most useful sizes) and in various colors: pearl, gold, silver, black and plain white and is the most useful and durable of all the different types of tubing available. The wise tyer will want to have all of these different tubings to create a wide variety of effects. Corsair tubing can be found in many fly shops. You can also order it directly from me.
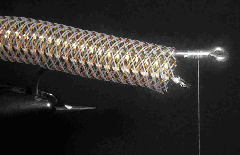
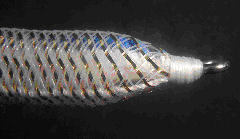
If you've not used Corsair tubing before, the most important thing to notice about it (apart from its usefulness) is that it has a thread line running along each. This thread line controls the density, flexibility, and the degree to which the material can be stretched and tapered, as well as shaped (e.g. flattened or made oval). In addition, these thread lines may also serve to suggest the lateral lines of the natural baitfish. To create and maintain the best shapes and tapers, these thread lines MUST be tied down at BOTH ends of the tubing when forming the head.
A helpful hint: Before pushing the tubing back over the shank, squeeze the tubing slightly, to loosen up the material a bit; then cut the tubing at a point slightly behind the points of thread. This will cause the thread lines to pop out of the material, sort of like a snail's horns (this makes it really easy to tie down the thread lines).
To flatten the head simply squeeze between your thumb and forefinger it until it flattens to the degree desired. To create a "belly" simply apply downward finger pressure while squeezing.
